Hanging Protocols
A hanging protocol (HP) is a set of stored image layouts that can be automatically applied as studies are loaded. Without them, you need to organize the images on the screen to your liking each time you load a study.
Hanging Protocol Tool 
The Hanging Protocol tool is used to show the HP manager as well as provide quick access to applicable HPs for the current study. If this tool is not present in the toolbar you can add it via Tools → Customize → Show Hanging Protocol Manager and clicking on the corresponding "Toolbar" checkbox. Alternatively, you can show the HP manager via the menu at Tools → Standard → Show Hanging Protocol Manager.
Default Layouts
OnePacs Workstation comes bundled with predefined Hanging Protocols that are applied automatically. Until you create your own hanging protocols, the workstation will layout images according to the default protocols or layouts as specified per modality in the Layout Options screen (Tools –> Options –> Layout). The default HP for most exams is a 2x4 layout. Previously, the default hanging protocol was a 1 x 2 layout with the current exam on the left and most recent prior on the right. If no priors are present, both tiles will be filled with series from the current exam. Users who wish to use the previous 1 x 2 hanging protocol defaults may download and apply this hanging protocol definition file: OnePacsWorkstation-1x2-Hanging-protocols.whp
MG studies have unique default protocols tailored for Mammography.
Creating a Hanging Protocol
To create a hanging protocol, activate the Hanging Protocol Manager as described above. Initially, a default HP is automatically created based on your current layout settings and loaded studies, but it is not shown in the list. If you were to simply click the Add button  , make layout changes and click the Save button
  , then any time you loaded a similar study, it would be displayed the same way. By default, a new HP is set up with only one matching rule: that the loading study should match the specified modality. As a simple example, if you create a HP from a CT study, then it will apply to every future loaded CT study and lay them out the same way.
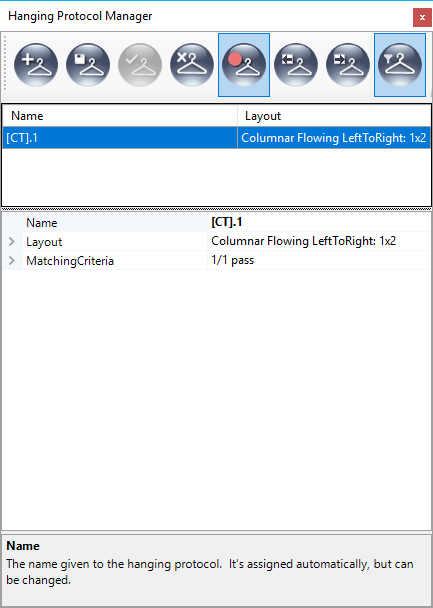
The Hanging Protocol Manager
The hanging protocol manager can be displayed by clicking on the "show hanging protocol manager" icon in the toolbar:

When activated, the HP Manager appears on the right side of the screen, and has four sections:
a toolbar
a list of applicable / non-applicable HPs to choose / select from
a property grid for viewing / editing the details of a HP
a message window for describing the selected element in the property grid.
When activated, the HP Manager appears on the right side of the screen, and has four sections:
- a toolbar
- a list of applicable / non-applicable HPs to choose / select from
- a property grid for viewing / editing the details of a HP
- a message window for describing the selected element in the property grid.
Anatomy Of A Hanging Protocol
Once a HP is selected, you can drill down to view its details and/or make changes through the property grid. Each HP has three top-level properties: Name, Layout and Matching Criteria.
Name
The name is automatically set to the modality (with some numeric suffix if needed for uniqueness), but can be changed. The currently applied HP's name is listed in the lower right corner of the workstation's notification area.
Layouts/Stages
The stage property is a multi-level property that specifies two things: how the screen is divided into image boxes and how series are selected to fill each image box. A Hanging Protocol may have multiple stages that the user can easy click through to quick pull up different layouts of the study (and comparison studies). To add additional stages, right-click on the "Layouts" item and choose "Add Stage
As you begin expanding the nodes in the layout property, you will notice that from here, the configuration of image boxes on the screen can only be viewed, it can't be edited. To do that, click the record button  to start recording the layout changes and use the Layout Manager
  ; any changes made to the layout are automatically reflected in the currently applied HP. Selecting an individual image box node in the property grid causes the actual image box to be selected - this helps to make the connection between them clear. Once the desired configuration of image boxes has been set (1×2, 2×2, 1×4, etc), you can then specify how series are allocated to image boxes by setting the Flow Direction property in the grid. Image boxes can be further subdivided into tiles; doing so displays multiple slices from a series as tiles within a single image box. This is also controlled from the Layout Manager, and is reflected in the HP's Layout property. The Study and Series Selection Criteria are the set of rules that are evaluated when this HP is applied; together, they determine how series are picked to fill image boxes. How to configure and interpret these rules is described in detail in a later section.
Matching Criteria
You are likely to create a number of HPs to record your layout preferences for a variety of study types. Because of this, it's important to have a way to describe the class of studies for which any given HP would be most appropriate. This is done using the Matching Criteria property, which is a set of matching rules. Each rule specifies a DICOM tag, its expected value and how they are to be compared (Equals, DoesNotEqual, Contains, DoesNotContain, StartsWith). NOTE: SameAsPrimary and SameAsImageBox are actually only used for the Study and Series Selection Criteria - you should not choose them for matching criteria.
So if a study has the DICOM tag the rule specifies, and its value matches what the rule expects, the rule passes; if not, it fails. A failed rule doesn't necessarily mean the HP will not be applicable to the study. That only happens if a Required rule fails, or if all of them do. By default, each rule is given a weight of 1. A HP's total score is calculated by adding up the weights of all the rules that passed. When a study is loaded, the HP with the highest score is automatically selected and applied. Once the study is loaded (and the most appropriate HP applied), all of the applicable HPs are listed above the property grid in descending order based on their scores. To choose one of them, select it in the list; its details are then browsable in the property grid. To apply it to the displayed study, click the Apply button  .
.
Study And Series Selection Criteria
When a HP is being applied to a study, its layout is first applied to divide the screen space into image boxes and tiles. At that point, the image boxes have to be filled with series; but which ones? The ones you wanted to see, of course! But how would it know that? This is where the Study and Series Selection Criteria come into play. They are rule sets that behave just like the Matching Criteria. For each image box, first, the Study Selection Criteria are evaluated to pick the study that is the best match (i.e. the one with the highest score). Then the Series Selection Criteria are evaluated for all series in that study to pick the best matching series; that's the one that gets displayed.
There are a few twists. There is one special “DICOM tag” (StudyType), and two special Comparitors (SameAsPrimary and SameAsImageBox) used to make these rules smarter. Let's consider the scenarios where they are needed.
In most cases, when multiple studies are displayed simultaneously, the user's main goal is to compare the “primary” study (the one selected when launching the workstation) with other similar recent studies for the same patient. In that case, the obvious choice would be to show series of the same modality and body part. These special rule features make it possible to do that.
Here's how they work. When a rule's DICOM tag is “StudyType” (which isn't a DICOM tag at all, but it's used like one here), the only value that makes sense is “Primary”. When a rule is set up like that, it will pass if it's evaluated against the primary study, and fail otherwise. This is done to anchor the primary study in the image box of your choice. If you like to read left to right, you'd place the primary study in the left-most image box and set FlowDirection to LeftToRight. Doing so automatically creates a Study Selection rule for that image box with:
- Property = [StudyType]
- Comparitor = Equals
- Value = Primary
You don't have to set these values - it's done automatically when you place the primary study in an image box. Also, when you alter the layout (change it from 1×2 to 2×2 for example), the other image boxes are instantly filled with similar recent studies from the same patient, and series of the same modality and body part (if available), and those choices are recorded in the HP as follows:
- Property = [Modality]
- Comparitor = SameAsPrimary
- Value = Blank
Note that the value is blank because it's not comparing to the DICOM tag in the series, it's comparing it to the DICOM tag in the primary study's selected series! Again, you don't have to set up these rules by hand, it's done for you. Of course, you can alter them if you like, but in most cases, you won't need to.
Another common scenario involves displaying multiple series from one study at the same time in different image boxes. It could be that your studies contain different views of the same body part that you like to see simultaneously. The SameAsImageBox comparitor is used to do that. This happens when you select a series in one image box from the same study that's already being displayed in another image box. That's all you need to do; again, the rule is set up for you.
When an HP is set up using these special rule features, and saved, then similar studies you load in the future should be organized on the screen the same way every time.
Editing a Hanging Protocol
Many of the features of a HP are automatically set up and don't require manual editing. But there are times when you might want to make changes by hand.
Adding A Rule
Each rule set has an empty rule at the end. It looks like a plus sign with nothing to the right of it. To add a rule, simply expand the empty rule and set the values. After the new rule has been added, another empty rule will be placed at the end. Just repeat this process to add more rules. Note that when selecting a DICOM tag from the drop-down list, something is automatically placed in the Value field. This value came from the DICOM study automatically to save you the trouble of typing it. It can be changed, but in most cases you won't need to.
Changing A Rule
To change a rule, expand it to expose its underlying fields. Then edit the fields as desired.
Deleting A Rule
Select the rule you wish to delete, then press the Delete key.
Managing Hanging Protocols
There won't be one single HP that fits all studies and viewing scenarios, which implies managing a list of HPs. The Hanging Protocol Manager's toolbar is used to do that.
Adding A HP
A default HP is automatically created (and applied) whenever you load a new study type for which no HP currently exists, but it is not shown in the list of hanging protocols. To create a new hanging protocol, click the Add button, which will clone the default HP if there is no HP selected in the list, otherwise the selected HP.
Saving A HP
After having created and set up a HP the way you want it, click the Save button on the toolbar.
Applying A HP
Select the HP you wish to apply and click the Apply button
Deleting A HP
 Select the HP you wish to delete and click the Delete button
Recording Layout Changes
Select the HP you wish to start / stop recording layout changes for and click the Record button
Exporting A HP

Select the HP you wish to export to a file and click the Export button
Importing A HP
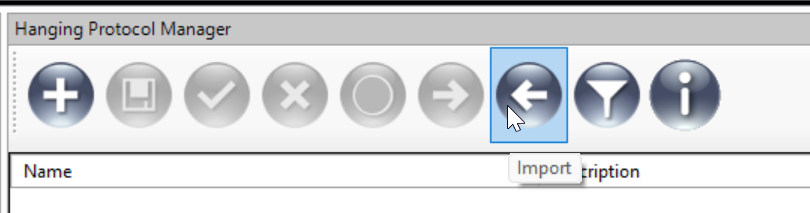
Click the Import button if you wish to import one or more hanging protocols from a file.
Filtering HPs
 Click the Filter button to show / hide non-applicable HPs
Automation And Variability
It's worth pointing out that the goal of a hanging protocol system is to automate layout choices, and that it should make the perfect choices every time. With perfectly consistent data, that's possible. However, most real-world environments include data that is less than perfect. The HPs rely entirely on what's provided in the DICOM headers of the studies. If all studies originate from a single source (the same institution, department, scanning device, etc), there is a good chance that the DICOM headers will have a high level of consistency over time. But even in that case, some tags may vary by operator (modality tech). Of course, there will be more variability when the data is coming from multiple sources (telerad, for example). In that case, it's possible that the system will make less than optimal choices. You might need to manually select an alternate HP to apply, create additional HPs, or manually layout some studies.