Guide to Basic OnePacs Functionality
Guide to the basic steps involved in study lookup and report review
| Table of Contents | ||
|---|---|---|
|
Purpose and Scope
The purpose of this brief guide is to familiarize the new user of OnePacs with the steps involved in searching for studies, reviewing study status, using the simple JPEG based image viewer, and reviewing reports.
There are many features available in OnePacs which are not covered in this Quick-start guide. For more detailed information on using and configuring OnePacs, please consult your local system administrator or your designated OnePacs customer support representative.
Browser Support
OnePacs supports the following browsers:
- Firefox 49Chrome 52+ (recommended)Chrome 52
- Firefox 49+
- Internet Explorer 11
Logging in
| Include Page | ||||
|---|---|---|---|---|
|
Worklist
The “worklist” functionality of OnePacs refers to the standard means of listing cases which are in the OnePacs system according to the user's desired criteria. Users have the option of generating one or more customized worklist views, which can be accessed through tabs at the top of the OnePacs worklist view page. The two main types of worklist views are “search views”, which dynamically search the system for cases that meet certain criteria, and “folders”, which are static lists of cases that are placed into folders manually by the user (or, which can be auto-added to the folder by OnePacs according to auto-store criteria). When a case is added to a folder, it remains in the folder until manually removed. This type of worklist view is appropriate for management of teaching files, or for storing cases which need to be acted on later by the radiologist (such as cases requiring followup or phone calls).
In contrast, search views are continuously updated according to the user's chosen criteria, and cases which no longer meet the criteria for the search view will be removed from the worklist. Search views are useful for workflow management, in that cases which no longer meet appropriate criteria (such as, “unread cases from the last 3 days”) will be removed from the worklist when their status changes (such as, when the case status changes from “unread” to “read”).
A more detailed overview of the various components of the worklist view may be found here.
Worklist review
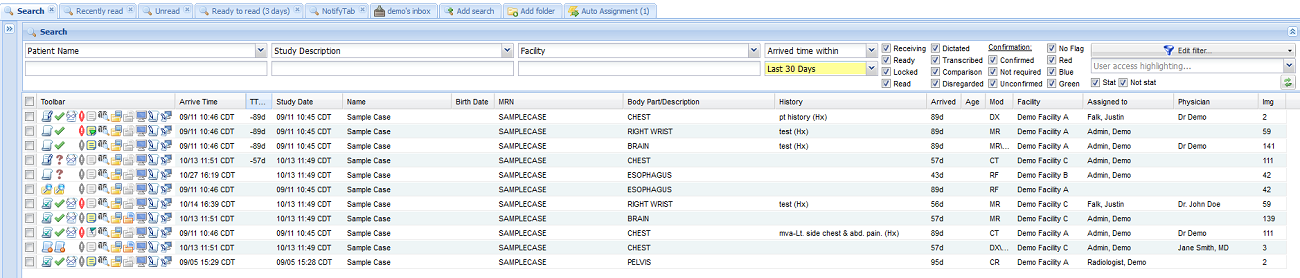
After you log in, the system will display a list of studies and information about those studies. By default, the system will list all studies which have been sent to the OnePacs system within the last 30 days. This time range is indicated in the upper right hand corner, in the box which contains the text “Last 30 days”. (See figure below.) Criteria that results in studies being filtered will be highlighted in yellow. Click the green arrows on the search panel to reset the search criteria.
Case data displayed on worklist
Each column of the worklist shows information about one study. The information displayed includes the patient’s name, the date the study was performed, the date the study arrived on the OnePacs system, as well as the current status of the study.
Study status icons
Studies will have one of the following statuses.
• In transmission to OnePacs: the status column will show an hourglass icon: ![]()
• Arrived at OnePacs, but awaiting confirmation of the study by the transmitting facility: A blank report page with a question mark will display: 
• Arrived at OnePacs and ready for a radiologist to read: a blank report page icon will display: 
• Disregarded – if a study was received by OnePacs but will not receive a report (examples would include studies sent only for comparison purposes), the blank report icon will display, with a red “minus sign” symbol overlaid on the report: 
• If a report is currently being written for a study, a lock icon will display: 
• After a study has been read and the report for the study is available, the report paper icon will show lines of text and a green check mark: 
For studies which have reports, a second icon will appear on the worklist which is used to view the radiology report. This icon consists of a pair of eyeglasses overlaid on a piece of paper:  This icon will appear immediately on the right of the “report ready icon”, as follows:
Thus, on the sample set of cases seen in the figure below,
The 1st case is currently being sent to OnePacs.
The 2nd case has arrived at OnePacs, but is awaiting confirmation of the study order and details.
The 3rd study has been confirmed for reading and is locked for reporting.
The 4th case has been disregarded.
The 5th study is ready for a radiologist to read, but have not been read or assigned yet.
The 6th study was sent only for comparison and does not require a report.
The 7th study has a report, which is available to read by clicking the display report icon.
Study statuses are shown in the left hand column.
Worklist Navigation
Paging Controls
The worklist may display more cases than fit on one screen. In this case, the list of cases will be split across more than one page. At the bottom left hand corner of the worklist view, there are navigation arrows that allow the user to switch between “pages” of a multiple-page list of cases. (See figure below.)
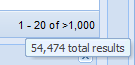
The paging controls will generally indicate how many pages of cases there are, and which page is currently being displayed. If there are more than 1000 results some paging controls may not be available and the total results will only show that there is more than 1000 results. The arrow pointing to the right can be clicked on to switch to the next page of cases, and the arrow pointing to the left can be clicked to switch to the previous page of cases. Text will pop-up indicating which arrow switches to the previous page, and which to the next page of cases. If there are more than 1000 results and you want to see the total number of results for the current worklist filter you can hover over the estimated results to query for the total number of results.
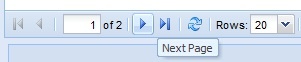

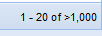
Paging controls. At the lower left hand corner of the screen, controls exist to switch between multiple pages of cases when there are more cases than fit on a single screen.
Date range
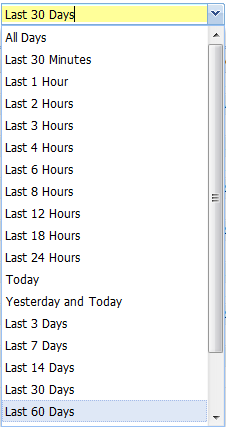
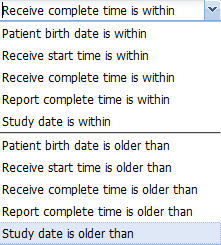
The time period can be changed to different criteria. For example, for night call one may wish to see only cases from the previous 6 hours. Or, to look up results for an old case, one may wish to see cases from the last 30 days. By selecting the appropriate date range, one can change the set of cases which display on the screen to facilitate finding the cases one needs. (See figure below.). Various date search criteria are also available.
Date ranges
Study Status checkboxes
In the upper right hand corner of the screen, there is a list of study statuses. The checkboxes indicate whether you wish for studies that have that status to appear on the study list. When you first log in, the system will display cases of any status, therefore all the checkboxes are checked. If you are only interested in seeing cases that have have been read already, you can de-select all of the checkboxes except the “Read” button. (See figure below.)
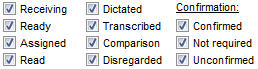 Study status checkboxes, with all boxes checked. The worklist will show all cases, of any status.
 Study status checkboxes, with only the “Read” box checked. The worklist will show only cases that have already been read, and have reports available in any confirmation state.
Searching for cases
After setting the date range, and selecting the checkboxes for the types of statuses for which you want studies to display on the worklist, you can next narrow down the cases that display on the list by entering in search criteria. In the upper portion of the screen, there are several search boxes. In Figure 7, the “Patient Name” and “Study Description” search boxes are circled.
To limit studies displayed on the worklist by search criteria, simply enter your desired search text in the text field under the listed search criteria. For example, one may search for a specific patient with a certain study description.

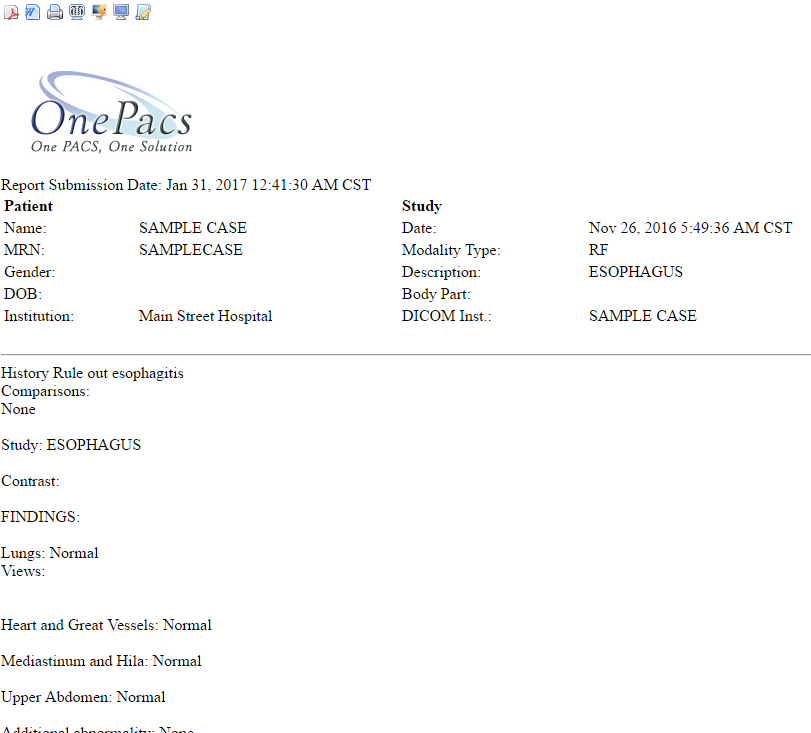
Viewing and printing reports
When a report has the status of “complete”, there will be a view report icon on the worklist toolbar which appears displays the following icon in the toolbar:
When this icon is clicked, the report for the study will display in a new window (See figure below.)In the upper left corner of the window, there are icons that can be used to export the report to PDF, RTF (Microsoft Word), Print, or to view the images of the study in various viewers.
Example report display.
Additional features of OnePacs
The following features of OnePacs may also be of interest:
Confirming studies
Depending on how OnePacs has been configured for your facility, it may be necessary for studies transmitted to OnePacs to be “confirmed” before they are ready to be interpreted for reporting. “Confirmation” of studies serves all the usual purposes of paper study requisitions - they confirm that interpretation has been requested for an examination, provide basic information regarding the patient and the requesting physician, describe where the report should be sent, and provide study history.
A full description of how to confirm studies is available here.
Study Notes
Users with the View/edit study notes permission may add study related notes or flag a study. A full description is available here
Preferences
Users who have been given the “View user preferences” permission may access and modify their user settings, including user password.
To access the user preferences page, select the “User preferences” item from the “Options” menu:
For more information on User Preferences see User Preferences.
Uploading images and CDs
CDs and other DICOM images may be uploaded directly from a facility. For more information see Direct upload using the web interface
Using the lightweight JPEG-based image viewer
A lightweight JPEG-based study viewer is available in OnePacs. Please click here for details.
Using the Quality Assurance (QA) case tracking system
OnePacs features a Quality Assurance (QA) case tracking system that enables authorized users to enter discrepancy reports for interpreted cases. This may be used by client radiology groups using the services of teleradiology groups, or any other individuals who may need to report discrepancies regarding examination interpretations.
The QA features facilitate keeping track of specific cases for which discrepancies need to be reported, allowing the interpreting radiologist and/or radiology group to review the QA issue and issue a response, and keeping track of statistics regarding QA issues.
Usage of the QA system is described in detail here.