...
The Study Retriever is available for mac OS, packaged along with OnePacs Workstation for macOS. The OnePacs Study Retriever for mac OS may be installed with or without the OnePacs Workstation medical imaging viewer.
System Requirements
System requirements for the Mac mac OS X version are as follows:
- Mac OS X v10.12 or later
- Requires a minimum of 2 GB of RAM, 8 GB or more recommended
- Requires a DICOM viewer application capable of receiving studies by C-STORE, such as OnePacs Workstation for macOS.
...
During normal operation, the Study Retriever creates, and frequently updates, a large number of small files on your disk. This may add a small, but unnecessary, overhead to the Spotlight search indexing process. To avoid that, we recommend excluding the Study Retriever data folder from the Spotlight search database by performing the following steps.
- Open the System Preferences application.
- Click the Spotlight icon.
- Select the Privacy tab.
- Add the onepacs folder in your home folder to the list of locations excluded from Spotlight.
App Nap
macOS mac OS has a feature called "App Nap" which puts long running apps into a power saving mode. This can affect the Study Retriever app because it needs to download studies, even when running in the background. It is possible to "Prevent App Nap" for specific applications. It is recommended that this option is enabled for the Study Retriever. See http://www.cultofmac.com/253064/how-to-turn-app-nap-off-for-specific-apps-on-your-mac-os-x-tips/ for instructions.
Setting up the OsiriXTM DICOM viewer to work with the Study Retriever
The Study Retriever can be configured to store and open studies in OsiriXTM. To enable this integration, follow these steps after installing the Study Retriever.
- Ensure that the OsiriX DICOM Viewer version 6.0 or later (most recent version recommended) is installed.
- Launch the OsiriX viewer.
- Open the Preferences window and select the Listener icon. (See screenshot below)
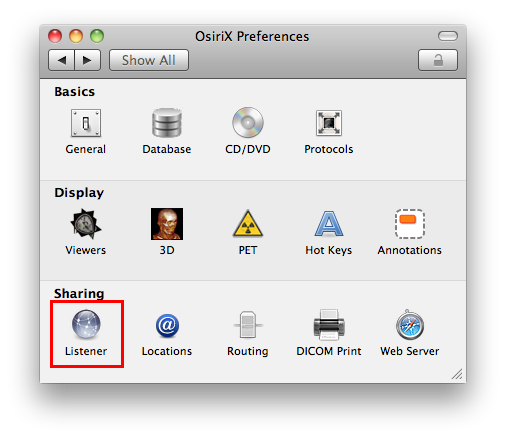
- Ensure that the option "Activate DICOM listener when OsiriX is running" is checked. (See screenshot below)
- Increase the time-out for DICOM communications to 300 seconds (to accommodate very large multi-frame instances).
- Note the AETitle and port number. You will need to configure the same values in the Study Retriever preferences.
- Ensure that the option "Activate the osiriX:// URL support and HTTP XML-RPC Server on port" is checked. (See screenshot below) The actual port number can be any value that doesn't conflict with another application running on your computer. The default value of 8080 should be fine in most situations.
- Open the Study Retriever preferences and configure and activate a store destination with the AE title and port from step (6).
...