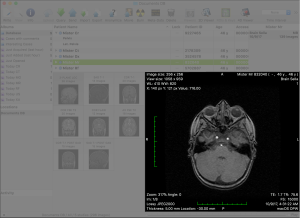
The database window is the main window in OnePacs Workstation for macOS. The main purpose of this window is to allow you to access and manage the locally available datasets. When additional studies are imported, they appear in this window.
...
Many customization options are available for the database window. In this page, all the customization options we mention are available in the Database preferences pane, unless otherwise indicated.Database

Graphical User Interface
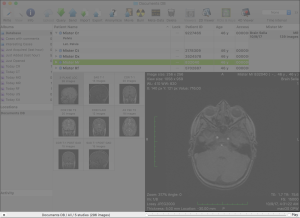
The main portion of the window is dedicated to the datasets browser. In the studies table, data is organized in disclosable study items. To the right of the outline, the history list displays a list of studies that belong to the same patient as the selected items. The selected studies or series are displayed in more detail in the lower portion of the window, where a grid of thumbnails is displayed on the left side. The selected element in this grid is previewed in the lower right portion of the window. The size of these views can be adjusted by dragging the borders in between them.
As the application main window, the database window also provides quick access to other databases and DICOM nodes, and displays the status of background processes. These extra elements are available in the left portion of the window, along with the albums list.
At the top of the window, the toolbar allows you to access tools that interact with the displayed data. The bottom bar provides extra database information and tools.
The series parsing section of the preferences allows you to redefine how datasets are grouped into studies and series. You can also define how series and images are sorted in the series sorting and image sorting sections of the preferences. Other options are described in this page and in the data management section.
The Toolbar
| Anchor | ||||
|---|---|---|---|---|
|
...

The database window toolbar provides access to tools and functions that interact with the selected database item, with the database itself or with global elements of the application interface.
...
This customization interface is a common user interface element in macOS and you should be familiar with it. It allows you to reorder and insert items by dragging them to the desired position or out of the toolbar to remove them.
In this section, we will review these toolbar items while grouping them by their purpose.
Database Filtering
Additionally to the filtering applied because of the album selection, you may use the following tools to filter the studies table items.
Database | This item allows you to filter the displayed studies by providing a string to match against the available items. By enabling the soundex checkbox, the search mechanism will use an algorithm to also include phonetically matching items. By clicking on the little loupe icon, you will be able to specify what item properties your string shall be matched against. If an album is currently selected, an additional label will appear, telling you how many studies match in the complete database. By clicking on this label the album will be deselected and the whole database results will be displayed. |
Database | This item allows you to filter the displayed studies by their modality. |
Database | This item allows you to filter the displayed studies by their creation date. |
Data Visualization
Database | This button has the same effect as double-clicking an item in the studies table or the thumbnails grid, or double-clicking the preview: it opens a viewer displaying the selected series (the one that is displayed in the preview). |
Database | This button parses the temporal data of the selected series and opens a viewer that allows both spatial and temporal browsing of the series. |
Database | This button opens a viewer displaying the images in the selected series that are marked as key or contain ROIs. |
Database | This button opens a meta-data browser for the selected image. |
Data Import, Export and Anonymization
The following buttons focus on DICOM communications:
| Database | This button opens the DICOM Query & Retrieve interface, allowing you to search the configured DICOM nodes for additional datasets. |
| Database | This button opens the DICOM Send interface, allowing you to send the selected datasets to a configured DICOM node. |
The following buttons focus on DICOM file storage:
| Database | This button allows you to use the system files browser to import additional datasets. |
| Database | This button allows you to use the system file save browser to export the selected datasets. |
Database | This button opens the Anonymization interface, allowing you to specify what fields should be removed, inserted or modified, in the selected datasets. |
Database | This button creates a DICOM file containing a record of all key image flags and ROIs in the selected datasets. |
The following buttons provide additional dataset exporting options:
| Database | This button sends the selected datasets to your OnePacs account. This button is only enabled if the selected study is recognized by the OnePacs system, and if the selected datasets aren't already stored on the OnePacs servers. It requires a running and configured OnePacs Study Retriever app. |
| Database | This button opens the CD/DVD burning interface, allowing you to store the selected datasets on a disk. |
Database | This button exports the current series as a movie file. |
Other
| Database | This button deletes the selected datasets. |
| Database | This button opens the information page for the selected item. This button is only enabled if the selected study is recognized by the OnePacs system. It requires a running and configured OnePacs Study Retriever app. |
| Database | This button opens the report for the selected item. This button is only enabled if the selected study is recognized by the OnePacs system and if a report is available for the study. It requires a running and configured OnePacs Study Retriever app. |
| Database | This button opens the report edition page for the selected item. This button is only enabled if the selected study is recognized by the OnePacs system. It requires a running and configured OnePacs Study Retriever app. |
| Database | This button brings the open viewer windows to front. |
Database | This button rearranges the database window interface so all its elements are visible. |
| Database | This item separates other items with a blank space that has a fixed size. |
Database | This item separates other items with a blank space that has a dynamic size that is automatically adapted to the toolbar size. |
The Studies Table
| Anchor | ||||
|---|---|---|---|---|
|
...
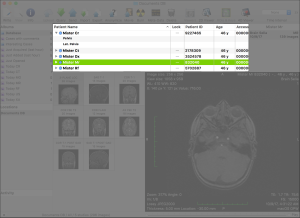
Studies and series are presented in a table. You should be familiar with this data presentation model, quite common in macOS apps and in the Finder itself: you may change the items order by clicking on the column headers, thus determining the new primary sorting key, marked with an arrow sign; by clicking on the current primary sorting key column header, you will invert the sorting order. By right-clicking on the table headers you can choose which columns should be displayed, and you can reorganize the order in which columns are arranged by dragging them to their desired position.
Study items can be disclosed to display their series. By selecting items in the table, the represented objects are displayed in the thumbnails grid and consequently in the preview area. Double-clicking an item will open its represented dataset in a viewer window.
...
- The Lock column cells can be clicked to toggle the item lock flag: locked items won't be removed by the database auto-cleaning mechanism;
- The Status column cells can be clicked to assign the item status property: available statuses are empty, unread, reviewed, dictated and validated;
- The Comments column cells (and Comments 2, 3 and 4) can be clicked to edit the comments.
The History List
| Anchor | ||||
|---|---|---|---|---|
|
...
The history list provides quick access to other studies that match the patient information of the selected dataset.
...
By double-clicking an item in this list, the corresponding dataset is transferred to the local database. Double-clicking a study that is already partially in the local database will retrieve the missing images.
The Thumbnails Grid
| Anchor | ||||
|---|---|---|---|---|
|
...
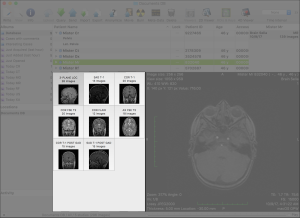
The thumbnails grid displays the content of the items currently selected in the studies table. When a study is selected, its series are displayed in this grid; when a series is selected, its images are displayed.
The object represented by the item selected in the grid is also displayed in the preview area. Double-clicking an item will open its represented dataset in a new viewer window.
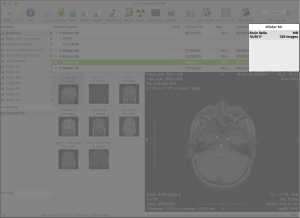
The Preview Area
| Anchor | ||||
|---|---|---|---|---|
|
...
The preview area displays the dataset represented by the selected item in the thumbnails grid.
This view is a basic, stateless version of the viewer, where interaction is limited to spatial navigation: only zooming, panning, rotation and WL/WW adjustments are allowed through the default keyboard modifiers.
The Albums List
| Anchor | ||||
|---|---|---|---|---|
|
...
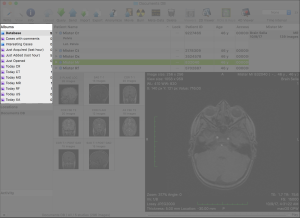
Albums are either user-defined filters (smart albums, displayed with a purple icon) or user-defined collections (plain albums, displayed with a blue icon). An extra item named Database, always available at the top of the list and selected by default, represents an empty filter.
...
A set of predefined albums is created when opening a database that contains no albums. You can delete these albums and create your own through the Albums submenu in the File menu, or through the contextual menu, by right-clicking in the albums list.
The Locations List
| Anchor | ||||
|---|---|---|---|---|
|
...
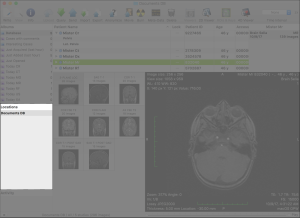
This area lists known local databases, mounted volumes and network nodes (DICOM and shared database nodes).
...
| Is Selectable | Is Valid Destination | |
|---|---|---|
| Local Databases | Yes | Yes |
| DICOM Nodes | No | Yes |
Shared Database Nodes | Yes | Yes |
| Mounted DICOM Volumes | Yes | No |
The Activity List
| Anchor | ||||
|---|---|---|---|---|
|
...
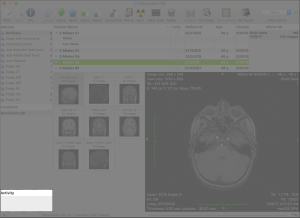
The activity area displays the status and progress of background tasks, e.g. DICOM communications.
Certain tasks allow you to signal them to abort their process. For these tasks, a cancel button is displayed in the top-right corner of the corresponding cell. Cancelling a task doesn't necessarily instantly remove it from the list: items are only removed when the related process completes.
...
 The Bottom Bar
| Anchor | ||||
|---|---|---|---|---|
|
The bottom bar is split in three sections. In the left edge, a button allows you to toggle the visibility of the left bar (the albums, locations and activity lists). In the right side, under the preview area, a scrollbar allows you to scroll the previewed series, and a checkbox allows you to toggle its automatic progress. In the middle, you can read some statistics about the loaded database.
Data Management
| Anchor | ||||
|---|---|---|---|---|
|
Generally speaking, the database window displays the contents of a database. By default, the app creates and loads a database from the user's home folder: more precisely, the default database location is ~/Documents/OnePacs Workstation Data (the tilde sign represents the user home folder location). Users can change the default database location in the preferences.
...
To add files to the database, use the Import toolbar item or the corresponding File menu item, or drag them into the database window or into the app dock icon. When manually adding datasets to a database, you can decide if you want to copy these files into the database or if you want the database to keep references to their location. The preferences allow you to choose either behavior, or to always be asked. Datasets added through DICOM communication are always stored in the database.
Auto-Cleaning
If you use OnePacs Workstation for macOS over a long period or intensively, you may run out of storage space. To avoid this problem, the app offers an auto-cleaning mechanism: if enabled, when a certain storage space threshold is reached, the app will start deleting datasets from the database.
...